Posted on Leave a comment

If you’re looking for my latest post on Zero Waste homemade soap, it will be right back (updated!)

UPDATE: you can read all about Zero Waste soap again!

How to make Zero Waste homemade soap!

ORIGINAL POST (OLD): We are having technical difficulties with the latest, great post on Zero Waste Homemade Soap.

I’m so disappointed, but WordPress tech is helping me retrieve my lost post.

I hope to have it republished tonight by kickoff time! It’s Super Bowl Sunday in the States.

Please enjoy some unique posts while you’re waiting…

How (and why) there are no toekicks under my kitchen cabinets

I wanted to know, maybe you do too?…2018 farmstand culture blog superlatives

Forgotten herb: mugwort

DIY dry shampoo for brown or auburn hair

Forgotten herb: balsam apple

Posted on 6 Comments

How to make Zero Waste homemade soap!

How to turn any old oil into zero waste homemade soap. DIY soap making at its best!

You saw it first on farmstand culture. Find out: what is zero waste homemade soap, when and how to make it yourself. And, if you’re more into learning and watching rather than DIYing, read on for my personal experience with zero-waste soap making. I hope it inspires other positive, natural-lifestyle changes in your every day life.

It all started about a decade ago, before my sister and I had children. We loved the handmade soaps at Sunflower Farm Shop in Orange, Connecticut, and felt inspired to try making our own soap from scratch.

We spent about $100 on materials and equipment to get us started and spent an evening chatting, measuring and mixing up two batches of pure, chemical-free soap. You would never know it was only our first try. Those soaps came out great. My friends and colleagues asked me to make more…for years, but with kids and work and house and school and and and…it was nearly ten years before I made my next batch of handcrafted soap.

Find out how I use any old oils laying around the house to make zero waste homemade soap. DIY soap at its best!

Inspiration hit

Several months ago I looked in the cabinet and noticed a massive vat of expired organic coconut oil. Do you know how expensive those are?

We buy most of our pantry goods at an American wholesale club. Picture a legitimate warehouse, open to the public, with shelves stacked to the ceiling full of giant versions of everyday items.

Laundry detergent the size of a backpack. Whole fillets of king salmon that fill a tray so big, it is hard to carry. The coconut oil they sell is huge, approximately the size of eight normal jars of coconut oil. And, we only used half of our expired coconut oil. Ugh.

I felt annoyed and upset that we wasted the equivalent of a year’s worth of coconut oil. Clearly, we went through a coconut oil phase that faded before the supply ran out. But, when I opened it, the oil smelled fine. I was not about to throw it away. First, I made a coconut-coffee sugar scrub with some of it. A few days later, true inspiration hit…

Zero-waste soap

Back when my sister and I experimented with hand-crafted soap, we created our own recipes using online calculators. With these free calculators, you simply type in different quantities of whatever oils you have, and it tells you exactly how much lye and water you need to make your soap. 

Lye is dangerous but necessary to saponify (i.e. turn fats and oils into soap). Pretty much any natural fat will saponfiy if mixed with liquefied lye. Brilliant!

No need to waste that old coconut oil. It smelled fine and rather than eat it, I can turn it into soap! So I did. Here’s what happened…

My experiment

First, I ordered lye on Amazon. Be careful. Lye is dangerous and scary. It causes permanent burns to bare skin. Kids should never, ever be around lye. Grown-ups are barely trust-worthy around lye.

Then, I awoke our soap-making pots, measuring cups, and thermometers from their decade-long slumber. If you want to make soap, dedicate the materials to soap-making just in case there’s somehow some leftover lye or soap in them. Put labels on your soap-only cups, bowls and spoons. 

Almost there. I had gloves, but still needed a kitchen scale to weigh everything. At the end of the post, I’ll give you all the links to the key materials you need to make zero-waste soap yourself.

Creating zero waste soap recipes

I worked up a recipe for a simple coconut oil and olive oil soap, but since I found a small bottle of really old sweet almond oil, I threw that in, too. It passed my sniff test. If you find random old oils around the house, just measure how much you have and add it to your online soap calculator. Easy. 

Go through your cabinets and pantry and see if you have some old oils hanging around. Then, weigh them on your kitchen scale and enter the amounts you have into an online calculator. Sometimes, soap-makers call them either lye calculators or soap calculators. Same thing.

Here’s a good soap calculator: SoapCalc and here is a round-up post from The Spruce Crafts that mentions five others. Don’t be intimidated. The calculators look complicated at first, but once you start using them, it gets easier. If you really just want a very simple lye calculator for soapmaking, this one by TheSage is easy to use. 

Soap-making process and tips

Here is a recipe and video for cold process soap from Becky’s Homestead that inspired me to add olive oil to my zero waste coconut soap. You don’t have to add other oils. But, I like a softer bar of soap, and as she mentions in the video, coconut oil makes harder bars.

Cold process soap is made without heating the oil and lye mixture over a stove or in a crock pot; that would be hot process soap. As a beginner, I started with cold process soap-making, but it takes longer to cure (i.e. you have to wait a month before you can use your soap). 

Instead of rosemary oil, I used a half ounce of ginger essential oil in my zero waste soap for fragrance (because that’s what I had), and I didn’t add any color. 

Instead of using a mask and fan like Becky, I mixed my lye into the water outside and let it cool outside. I never open lye in the house. It’s personal preference. And, as the lye water cooled, I hid it outside away from kids and animals. 

If this is your first time bringing soap to “trace”, watch a few videos to get a better feel for the pudding-like consistency you need before you can pour your soap into the molds. 

You don’t need a fancy mold. You can use any old plastic container or even an old shoe box. TIP: line the mold with strips of parchment paper before you pour in the soap. Parchment strips make it easier to remove the soap the next day to cut it into bars. 

How to make zero waste homemade soap. DIY soap recipe

My mistake

After my soap hardened, I noticed that the outside dried lighter with some soda ash, and the middle dried darker. It doesn’t really matter. The soap works beautifully. Actually, it’s amazing how simple this soap recipe is, given how well it suds and cleans. However, my soap probably wouldn’t sell well at a farm stand. It’s not perfect. But, I think I understand my mistake.

I blended the lye mixture and oils when they cooled to 100 degrees Fahrenheit. But, it was cold that day. And, I mixed the lye outdoors and left it in the freezing cold. I think it would be better to blend my ingredients at a slightly higher temperature, maybe 110 to 120 degrees. 

Zero waste soap-making materials

You probably already own a mixing spoon, cups and bowls. Here’s a list of the less common materials you need to make your own zero waste soap at home.

Kitchen scale
Thermometer (You need one. I use two.)
Immersion blender (Don’t use this for food if you use it to blend lye into soap.)
Lye
Long rubber gloves
Protective eyeglasses

As an Amazon Associate, I earn from qualifying purchases. 

Thank you for supporting this blog!

Leave us a comment and let us know if you made some soap. What was your experience like?

Do you have old oils laying around the house that would make great zero waste soap? I will be asking my friends and family to bring me theirs!

Posted on 5 Comments

Forgotten herb: mugwort

Oh wow, that’s a terrible name. This herb could be the cure for cancer (unlikely, but follow me here), and everyone would overlook it because it’s called mugwort. In the plant world, you’ve got to be in some serious purgatory to be slapped with a name like mugwort…or…that’s how we’d see it now. In ancient times, names were pretty practical.

Let’s break it down

Mug. Ok, what’s that supposed to mean? Like you can put it in a mug. Yep, now I’m catching up. So, like, you can make tea with mugwort. Yes! Women used it to ease the symptoms of menstruation and menopause. Ancient wisdom says mugwort tea relaxes you and alleviates stomach aches. Another popular use was as a flavoring for beer before the widespread use of hops. Beer…mug.

In fact, with the growing popularity of homebrewing and foraging, mugwort beer is making a comeback. Here’s a simple recipe that uses dried mugwort leaves in Mugwort Lemon Beer, originally published by Grow Forage Cook Ferment.

Not to mislead you, it’s not what we think of as beer. This is a fermented, bubbly beverage, but it’s not made with hops. Instead, mugwort gives the drink herby, woody, slightly bitter notes.

Does that mean the “wort” part is like “wart”? Probably not. Mugwort is medicinal, but it’s more likely to be blended into a balm to relive itching than into a wort cream. Wort is probably just a derivation of the Old English word for “root”, which seems plausible given that the German word for root is Wurzel.

People argue that a tonic made with the root gives you energy. I find that confusing given the same online research claims a tea made from the dry leaves provides calming, anxiety-relief. Lots of potential avenues for study here.

Where do I find mugwort?

Practically everywhere. And, if you are familiar with the herb, you’ll recognize it in every season. It was once a medicinal, cooking and brewing herb, which means everyone grew it. It spreads easily, which made the plant an invasive weed in most parts of the world.

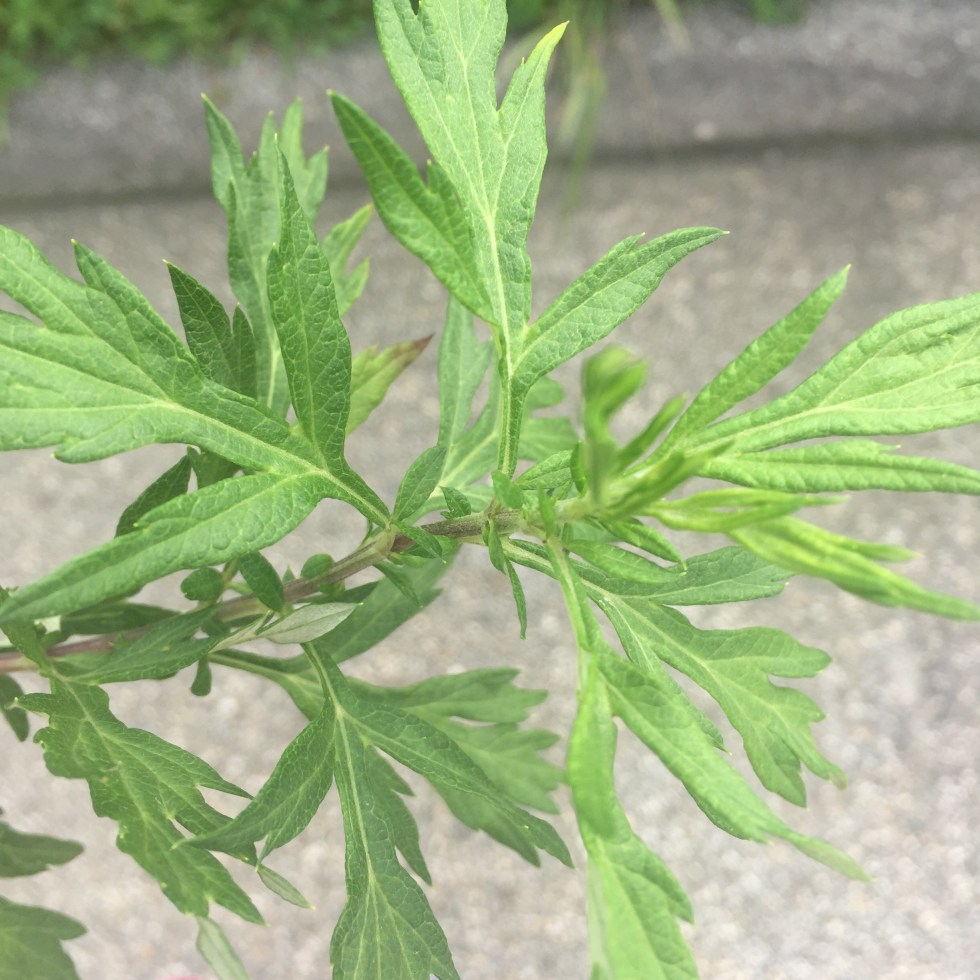
Mugwort is all around you, and yet, it is almost invisible to most people. Mugwort hides in plain sight. Here’s a strip of mugwort growing wild around the edges of forest and field. It looks like a green divider through the center of this photo. You’ve seen it a million times but did you ever notice it?

During warm months, you’ll see lots of adorable baby mugwort just beginning to sprout. You can wack one of those things 20 times with your lawnmower, and it will just shrug it off and keep on growing. Joke’s on you cause the roots get stronger. Maybe that’s why there are rumors that travelers and wary soldiers wore mugwort in their belts and shoes.

I took Chicago’s Orange line from the loop to Midway last Autumn and took a picture of mugwort growing along the railroad tracks.

My neighbor shouldn’t mind too much that I walked over to the edge of his yard and captured this late-season mugwort in it’s golden-brown glory.

Photographic proof that mugwort is all around us. It begs the question: why don’t we use this herb anymore? Well, supply is not an issue. Plentiful would be an understatement. There’s just no demand for mugwort.

Lack of interest

My best guesses: the flavor is unusual (Strike one) and the name is weird (Strike two). One possible problem, there is no popular dip made with mugwort. Who are we kidding? People love dips. If you don’t use an herb to flavor a salsa, shellfish or chip dip, the marketing department just isn’t going to call.

Tough to put that in a recipe, isn’t it? Imagine trying to impress your friends with a recipe that calls for delicious lemon, fresh thyme, smooth cream and…and…something weird called mugwort. Try telling your 14 year old that you’re baking some chicken and mugwort. Let me know what sort of a look she gives you.

Like a book judged by its cover, or wine judged by its label, the herb mugwort is judged by its awful name. Perhaps I can start a petition to change the common nickname of Artemisia vulgaris? Ugh, (eye roll) even its Latin name sounds like a venereal disease.

Let’s brainstorm

What would be a better name than mugwort?

Have you smelled or tasted mugwort? It’s in the lavender range but less floral and more woody. How about holinwood? A quick internet search tells me that’s not taken. It seems appropriate as the herb is a cousin to wormwood, a potent ingredient in absinthe.

I admit holinwood doesn’t have the same ring as sage, cilantro or dill, but it’s got a certain acceptable herbal masculinity. Too masculine? I mean, cilantro is kind of masculine, and it’s popular.

Herb of legend

There are all kinds of legends about mugwort. I mentioned travelers and soldiers carrying the leaves with them, which may have been for strength, as the internet suggests, or for the pleasant scent and use as an evening tea. Jury’s out until St. John the Baptist or a Roman soldier confirm their association with the herb.

Mugwort has a darker reputation…as an allergen. Some quick search engine checks show me that lots of people search for “mugwort allergy”. Strike three! I skimmed some academic articles on the subject. Mugwort pollen gives people hay fever. Guilty as charged.

Actually, it’s even darker. If you are pregnant, breastfeeding or trying to conceive, avoid ingesting mugwort. While it is difficult to study, legend and academic literature agree that mugwort is too risky for pregnant women.

What do we know for sure?

There’s a bunch of other stuff on the internet about mugwort legends. It’s an ancient herb with a rich history. You can do a quick search if interested. It’s highly repetitive, and it looks like every blogger who ever wrote about mugwort just copies these legends from the same places.

There’s no way to verify whether this stuff is true or some writer (me) made up a new common name for mugwort (holinwood) and then it became internet fact.

What I will share with you, is info I know for a fact. Herbal fans like to stuff dried mugwort leaves into dream pillows. Fact.

I first heard about mugwort at a yard walk housewarming party (read about yard walks here). Our hostess suggested making dream pillows full of dried mugwort leaves, which she loves. I can see how this practice came about, the scent is like a woodier, calming lavender. Some people describe it as a sage-mint, which is close, but it’s not as potent as mint. Maybe mugwort smells 80% like a medicinal sage and 20% like mint.

The small, handmade pillow is a little bigger than a pouch and is supposed to bring you vivid dreams. I’m not so convinced, but wouldn’t it be fun to try? Please leave a comment if you had a vivid, PG-rated dream because of mugwort.

She’s a keeper

My family and I attended a rehearsal lunch for a cousin who got married last year. It was October in New England, and the dads took three of the flower girls outside to play in the gardens around the restaurant.

The little girls picked the stems of long weeds growing along the banks of a creek, a favorite habitat for mugwort. They danced with them, dipped them in puddles and used them as brushes to write their names on the pavement.

I walked outside and just blurted out, “oh, it’s mugwort. Hey, girls, crush one of the leaves and tell me what you think about the smell.”

One of the dads said, “mugwort?” And I told them all about how it used to be used to brew a beer. Someone mentioned I’d be useful post-apocalypse. I get that a lot. And someone else shouted to my husband, “she’s a keeper!”

Consult the history books

Here’s the really good stuff. I saved the best for last.

Who can resist info I found about mugwort in really old books. Emphasize O-L-D. What I love about Google Books is that they scan pages as they appear with yellowed pages and historic font. Reading tip: the second “s” in a word looks more like an “f” to modern eyes.

Nicholas Culpeper mentions mugwort at least five times in this manual for midwives published in 1676, two decades after his death. Mugwort teas and tonics were thought to help expel the afterbirth, among other uses. But, wow, Culpeper gives his readers terrible advice about bleeding people and giving them toxic mercury: absolutely the wrong things to do. Do not go near mercury.

I love this Gardener’s Dictionary from 1768. The tag line is “Containing the best and newest methods.” The latest and greatest straight out of the 18th century! I guess we can’t chuckle too much, considering that mugwort is now almost forgotten, and we don’t even mention it in gardening books anymore.

Samuel F. Gray offers some brief notes about mugwort and its relatives in this manual from 1821. Common mugwort is on page 449.

The practical, everyday advice in these books drives home the point that everyone used this herb all the time, and then somehow knowledge of mugwort just faded away.

To combat that knowledge loss, the next time you see something that might be mugwort, would you just pick some leaves, crush them in your hand and rediscover the fresh scent?

Posted on 11 Comments

My three priorities for brightening up our farmhouse kitchen lighting

Find out why these black iron cage lights were selected for a farmhouse kitchen.

Lighting was a tough one in our kitchen design. Not because I didn’t know what I wanted…but because I knew exactly what I wanted down to minor details, and it took months of searching to track down. Our farmhouse kitchen lighting design started with three key priorities.

Priority #1

Ironwork. The main lights would have to be made from black iron. While Early-American Colonists didn’t have electric lamps, they did have ironworkers. Blacksmiths lived in every community and provided all sorts of everyday essentials. Plus, they handcrafted special items, like a peek-a-boo door on our 18th century beehive oven.

Of course, as soon as I knew they’d be black iron and Colonial-street lamp-inspired, I got a vision of cage lights…no glass, on chains…stuck in my head.

Now, in the two years since I was on the hunt for this exact style of light, they’ve popped up everywhere, but back in 2017, it took me two months of online searches to find these lights. I was particular about the number of light bulbs in the middle and about the loop that connected the light to the chain. To keep a Colonial look, I didn’t want that loop to have a funky, modern shape. It had to be a simple circle.

Black iron cage lights against a cathedral ceiling with reclaimed beams

Nothing is easy.

The lights are two feet tall. When they first arrived I was really nervous that they’d be too big. My husband and I lugged one of those lights up a 10′ ladder several times to test the size relative to the scale of the new kitchen. It worked.

On the day the electrician finally came to install them, I was so happy I skipped around all morning waiting for him to show up. We had been living with half of our downstairs gutted for four months, and finally, it would have light again! He took the first one out of the box and saw that a bolt at the top had snapped. The bolt on the next one snapped, too. In all, cheap, metal bolts snapped on four of the six lights.

Find out how I prioritized and recreated a blacksmith-forged ironwork lighting design for my Early-American farmhouse kitchen renovation.

What now?

Thankfully, I knew of a local vintage lighting shop that repairs and rewires lamps. We stuffed the four broken lights into my car, and I brought them to the kind, reasonable people at Connecticut Lighting Center’s Restoration Gallery. This is not a paid ad for them. I am a long-time customer of theirs who appreciates their honesty and collection of vintage lights. Gorgeous Art Deco antique lights. Crystal chandeliers. Love it. They fixed my lights in a few days for a reasonable price.

The electrician installed the six black iron cage lights between the reclaimed beams in our new kitchen. This farmhouse kitchen lighting is a key design statement when you first walk into the room, and that’s really the point.

You should think about two things when choosing your farmhouse kitchen lighting:

  1. Is it a statement light or do you want it to be subtle?
  2. How will it draw the eye around the room?

Priority #2

Unobstructed view. The back wall of our kitchen is meant to be a focal point. As a result, I didn’t want any pendant lighting to obstruct the view through the center of the kitchen. Pendants can be beautiful. I just didn’t want them to catch the eye on it’s way to the range and historic brick surround.

But, I did like the idea of having spot lighting on the island. And, sometimes you don’t want all six iron lights on, even though everything is on dimmer switches. It’s just too much.

semiflush black iron lights

The compromise was two semi-flush lights in the center beams, which cast a warm, subtle lighting in the kitchen. My husband found gorgeous vintage-inspired light bulbs that create a star-shaped pattern of light on the white marble countertops. I like to put simple mason jars filled with handpicked flowers right in the center of the stars. I wish the light bulbs were a whiter, brighter light, but my husband prefers the soft, warm glow.

Priority #3

Draw the eye to the back wall. Immediately after noticing the six overhead lights, guests should look to the back wall. To enhance that visual sequence with lighting, we concealed under-cabinet puck lights in each of the four upper cabinets. The only other lighting in the kitchen is in the hood vent above the range and on the range itself.

Notice something different about those cabinets? No toekicks. Find out why I made that choice:

How (and why) there are no toekicks under my kitchen cabinets

Posted on 8 Comments

Why I went over budget on our farmhouse kitchen hardware and…sure, you want to know how much?

Pewter bin pulls and knobs on a farmhouse kitchen cabinet farmstandculture.com

It’s a subtle design point, but I think it makes a world of difference in our Early-American farmhouse kitchen renovation. Hardware. The handles, knobs and pulls that make our cabinets functional. It took me two tries to get the right look with our farmhouse kitchen hardware. Quite a first-world journey.

This was supposed to be easy. I loved the look of black iron knobs against the white doors throughout the rest of our house. So, when we started our kitchen reno, I quickly picked out ridiculously inexpensive black cabinet hardware on Amazon and called it a day.

But…

then I held those dark knobs up against the white cabinets, and it just didn’t look right in the space. In my farmhouse kitchen, this hardware was too much. Black dots on the cabinet fronts were too much of an eyeball magnet.

Plus, inexpensive metal knobs feel light and cheap in your hand. There’s no weight to them. They scream cost-saver. At first touch, my initial selection felt like you could almost crush it just by squeezing.

In terms of durability, pretty much everyone who enters a kitchen interacts with drawer pulls. I didn’t want the finish to wear off in two years.

What now?

So, I did nothing. I ignored my gut and decided to put the knobs aside for a few weeks. Maybe the look would grow on me? Besides, neither the knobs nor the bin pulls could be returned. I already opened the packages. Why not just check every few days and see if my opinion changes?

Of course, no matter how many times I held them up, shifted them over an inch, and tried them in the morning light or the evening dusk, those heavy, dark knobs looked like polka dots on the white cabinets. Ugh. Nothing is easy.

Time to find plan b

I went to big box stores and fancy specialty shops. It turns out, you can spend as little as a dollar or as much as $35 per tiny little knob. It’s quite a wide range. And I studied them all. Iron, antiqued, chrome, copper, nothing felt right.

When in doubt, over-think it. Our lights are black iron. Maybe I was wrong about those black knobs and pulls after all. If just held them up one more time…nope, nope still too much, too much of a good thing.

Ok, the range is stainless steel. Maybe chrome or brushed nickel would complement it? Hummm, those shades of silver are nice, but they don’t reflect the authentic, Early-American style of our 1788 farm house.

The solution

Then, it hit me. The solution! Something authentic to the Colonial era but not iron. Years ago my aunt brought me to Woodbury Pewter, a beautiful shop where they sell handmade pewter items like mugs, candlesticks and pitchers. They use authentic 18th century techniques to craft their goods. Some items have a smooth, polished finish. Others are lumpy and rustic with a true handcrafted quality. You can spend all day there. It’s beyond gorgeous. Historic pewter. That’s my answer!

Pewter bin pulls and knobs on a farmhouse kitchen cabinet farmstandculture.com

We found a full set of pewter knobs and handles through Rejuvenation Hardware. Here are the exact same knobs I purchased.

Let’s talk budget

Budget blown. I thought we would save money on the hardware. Way wrong. Even though the first set of basic black knobs and bin pulls was 10 for $11…sigh…I wasted them. Actually, I stored them intending to put them on the cabinets in my master bath but haven’t gotten around to it yet.

The pewter knobs and pulls I selected came to a grand total of $1,205. I believe they cost more than our first refrigerator. Was it worth it? Well, I am a satisfied customer. Authentic pewter lives up to its luxury price tag. The knobs are hefty and durable with a color fit for a knight in shining armor. Pewter is a living finish, meaning it will age with intention over the years.

Pewter knobs and pulls in a white farmhouse kitchen with reclaimed shelves farmstandculture.com

Did you notice something unusual about those farmhouse kitchen cabinets?

How and why there are no toekicks under my farmhouse kitchen cabinets.

Sizing hardware

When you renovate a kitchen, you encounter some surprising questions, like…what size handles do I buy for different uses?

Oh come on, normal people don’t know if they should buy a 3″, 4″ or 5″ handle.

Do appliances need a larger handle? Yes, if you put cabinet panels on to conceal them. Ok, what size handles do appliances need?

How about the knobs? Do I need 1″, 1.5″ or 1.75″? Or should I just do handles instead of knobs on the cabinets?  Ugh. Nothing’s easy. 

All of our knobs were 1″. But, we chose three different handles for our farmhouse kitchen cabinets. On the upper drawers, we used 4″ bin pulls. For the big, deep lower drawers, we used two 4″ handles, and the appliances, which came panel-ready, got sturdy 6″ handles that double as a towel bar.

Farmhouse kitchen gray cabinets with pewter knobs and pulls farmstandculture.com

Hope you enjoyed reading about my search for the perfect, Early American inspired kitchen hardware. Check out the rest of the farmhouse kitchen renovation at:

Early American farmhouse kitchen design

Posted on 36 Comments

How (and why) there are no toekicks under my kitchen cabinets

Find out how I chose freestanding cabinets for my farmhouse kitchen remodel. No toekicks.

Let’s rewind to the year 2011. I had a new baby and a very old galley kitchen. One morning, I took a gallon of milk out of the fridge and as I set it down on the counter, it slipped and splat on the floor. The cap popped off. Milk was glug, glug, glugging out, and some of it slipped under the toekick on our 1980s cabinets. Untouchable. Can’t clean under there. I vowed that someday when I finally got a new kitchen, there would be no toekicks under my kitchen cabinets.

And then, about two years later my Dad dropped a huge, warehouse-club size olive oil in that kitchen. If you are not familiar with American warehouse-club sized olive oil, it’s the equivalent of about three soccer footballs full of oil. Some of the oil spilled under those pesky toekicks, too. Sealed the deal. I was done. No more toekicks.

Early American furniture did not have toekicks. Cabinet toekicks rose to popularity in the 1960s. Here is why and how I didn’t put toekicks under the cabinets in my Early-American farmhouse kitchen renovation design. #kichendesign

I focused on designing an Early-American farmhouse style kitchen. My house is over 230 years old. Even though I wasn’t willing to swap out my range for a giant fireplace hearth (so unauthentic of me), I wanted to limit the elements that weren’t around back then. Toekicks fall into that category.

What exactly is a toekick?

I didn’t know either, until I started thinking about renovating my kitchen. Underneath most kitchen and some bathroom cabinets, there’s this strip of wood, usually 4″ tall (a little over 10 cm), along the floor and the cabinets are placed on top. The strip of wood is the toekick.

Why my farmhouse kitchen cabinets dont have toekicks.

Benefits of a toekick

It’s not all bad. There are some good (and self-reinforcing) reasons why toekicks were invented and became so common.

  • Clean look
  • Covers mess underneath cabinets
  • Most cabinets already come with toekicks
  • No additional modifications
  • Installers are very familiar with toekicks

Drawbacks to a toekick

  • Rose to popularity in the 60s, 70s and 80s
  • The room feels larger if you open up space below the cabinets
  • If something falls into a crack, it’s gone till you demo
  • Liquids can slip under
  • Can’t clean under the cabinets (for like 30 to 50 years)
  • Mice make little nests in there (don’t ask how I know this, but it’s firsthand knowledge)
  • With spills, scuffs and dirt, you have to clean them or they look dingy
  • Not historic or farmhouse style

What replaces a toekick?

Realistically, there’s two choices. You can either put the cabinets on feet, like any other piece of furniture, or you can build up the molding at the base of the cabinets. We did both because we had to.

Most of our cabinets are on furniture feet. We had the cabinet maker craft the boxes without the toekicks. Then, the contractor installed them resting on a 2×4 along the back wall, which you can’t see. Finally, he nailed the furniture feet into place. Since our house is far from level, he spent extra time adding to and cutting down the feet to level off the cabinets. But, believe it or not, most of the weight rests on the 2×4 along the back wall.

Cute story. When I first told the architect, Rob White Architect, that one of my must-haves was no toekicks. He was speechless. He doesn’t go speechless often.

It was the first time any homeowner had made the request. Rob’s great though. He pivoted immediately and saw my vision. I appreciate that. Actually, he more than saw my vision. He and I both independently chose the exact same feet from a furniture catalog of a zillion options. That left me speechless.

No toekicks in this farmhouse kitchen where the white cabinets look more like furniture.

The fridge is hidden inside of an imposing wall of cabinetry. We couldn’t actually put the fridge on furniture feet or the wall of cabinetry. Instead, we built the molding up at the base of the fridge. You can see it in the background of the next photo.

We also couldn’t put the heavy island on furniture feet. Our island is hiding a bunch of pipes and a dishwasher on one side and is inset on the other side to create a countertop that we can slide stools underneath. We built up the molding on three sides of the island. On the fourth side, under the sink…I admit it…true confession…there’s a toekick. But, it’s small and hidden.

I inherited a table that we put at the end of the island, which gives us back the furniture feel. Phew.

Kitchen table at the end of a gray island and wide plank floors

My prediction

I predict that you will start to see preferences swing away from toekicks. I just have a feeling. They look awesome. You can clean under the cabinets easily with a dry sweeper or a mop. Also, unexpected benefit, a robot vacuum fits easily underneath.

If you’ve considered a robot vacuum before, I am pretty happy with mine. It’s not really a name brand, which means it’s a little cheaper. But, it’s easy to empty and simple to set up. My five year old can work it, no problem. The only thing is, it is not very good at docking itself to charge so I usually have to carry it back near the docking station before I press the “home” button. It’s great on hardwood or tile floors. It works pretty well on area rugs.

Hope you had fun learning about toekicks and a different way to think about them.

I am working on a whole series for the blog about my Early-American farmhouse kitchen renovation. Go ahead, follow along.

Early American farmhouse kitchen design

Posted on 3 Comments

I wanted to know, maybe you do too?…2018 farmstand culture blog superlatives

Most popular posts of 2018 from farmstandculture.com

Since 2018 is officially over, I can now go back and see all the stats…and you can too. It’s a little blog voyeurism. Of course, I only launched this blog in September 2018. Given the short four months this blog was operating, here is a quick post summarizing the 2018 farmstand culture blog superlatives.

Most viewed post of the year

Hummm…maybe I should save the “most viewed!” reveal for last, but I chose to tell you first. Which must mean that there’s some even more interesting superlatives later in this post.

I was surprised by the post with the most views. Are you? What surprised me is that it doesn’t start with “how to” or a number (e.g. 5 best…). And it’s not explicitly about farm stands or natural living or gardening…even though that is mentioned. It’s not even a post suitable for an obvious Pin ad like a DIY sugar scrub would be.

Given that this post was so popular I can only conclude that you all correctly figured me out. I am a nauseatingly well-adjusted, happy and content person, and I should be sharing more about my thought process with you.

With 130 views in 2018, my Most Viewed Post is…

Why do I make life harder on myself?

Greatest number of likes

Do likes even matter? If you use WordPress, you can just scroll through 50 posts per minute, liking them without reading more that just the titles. It could seriously be some bizarre argument, and you might accidentally “like” it because the title mentions kittens. And who doesn’t like kittens? So cute and soft.

For the record, none of my posts are about bizarre stuff like that, and all of my titles are reflective of the content of my posts.

And with 68 likes (actually as of 1/9/19 cause I didn’t look on New Years Day) and counting…

Forgotten herb: balsam apple

Racked up the comments

Well, this shouldn’t be as much of a surprise to you as it was to me. The post with the most comments was also your most liked post of 2018.

Thirty-six of the currently 43 comments on this post happened before January 1st…

Forgotten herb: balsam apple

Least love

Ok, it’s not really a superlative any post wants to be awarded, but it’s still interesting. One of the concepts I had when I was inspired to start blogging was to encourage and challenge you to be more mindful when shopping at farm stands by trying to rank your top 5 items. I have a whole series on this blog showing you my farmstand5’s.

My sad little post with the least attention, receiving the fewest views and comments in 2018 with a grand total of four views was…

Best 5 items at Killam & Bassette Farm Stand, Hartford, CT

Top Instagram picture

If you follow me on Instagram, maybe you noticed about two months ago I started writing mini-blog posts as comments with my Instagram pics. I was stuck on the down slide of the follow-unfollow game, watching my follower count slip every week. So with nothing to lose, I started doing what I do well, accompanying my mediocre photography with interesting commentary.

I’m a big fan of the “tell-me-something-I-don’t-know” approach and that helped stabilize my follower count. It also helped me get 245 impressions on this photo of half of a flock of turkeys in my backyard accompanied by the absolutely fascinating story of how Connecticut repopulated the wild turkeys the colonists had eradicated.

Highest impressions on a Pinterest pin

Oh Pinterest gave me the greatest thrill one morning last October when I had my first pin get 19,000+ views and dozens of clicks through to my post on Swedish Dishcloths. That was my first pin to get thrilling, but it was not my most popular pin of 2018. False start.

The honor of being my most popular pin in 2018, with 20,851 impressions, 22 clicks and 11 saves in three days…because I only posted it on December 29 was…

My husband did not like my collection of essential oils very much until they helped his upset stomach. Try this custom blend of three essential oils that I use on my family when someone has a stomach ache.

3 of the best essential oils for upset stomachs

My personal favorite post of the year

Hey, at least I’m not kidding myself. I know this quiet little post hasn’t received a ton of attention and won’t be my claim to fame. It’s just one I really enjoyed writing. It’s one I return to on occasion to make me smile. I had the idea for this post before I started the blog. It was one of the posts I knew I was destined to write.

All of the other posts mentioned here are your favorites from 2018. This was mine:

Weeding is winning

Thank you for sharing this journey through the 2018 farmstand culture blog superlatives with me! Have a great day today. Oh and, did I miss any posts you think should deserve an honorable mention? Go ahead, let me know in the comments.

Posted on 11 Comments

How I made one change to stop wrinkles around my mouth

Tiffany Burns writes at farmstandculture.com

I’m 37 now. And two years ago, I started to notice wrinkles around my mouth. If you thought I was going to tell you about an all-natural cream or DIY face mask to reverse the signs of aging, I’m not. I used something much more immediately effective to stop wrinkles around my mouth from getting worse.

Actually, to be more specific, it’s mostly one line one the left side of my mouth that’s becoming deeper as I age. What?! I just kind of assumed that it wouldn’t really happen to me.

Wrinkles happened

Really? Tiff, you didn’t think you’d get wrinkles? Hey, I was young, and oddly enough, in terms of keeping me in a cloud of denial, it helped that my husband is five years older than me.

When we met I was only 18. Our circle of friends is older than me, mostly. I always looked much younger than the people around me. I was in high school. They were college grads. They were born in the 70s. I was born in the 80s. From their perspective, I didn’t even look like I was aging.

Looking younger became part of my self-identity. The young one. A kid. Youthful, glowing, young-looking skin. I didn’t think much about wrinkles. Didn’t need to, they weren’t going to happen to me.

Times change

But then, I noticed wrinkles on our friends, mostly around the eyes for the ladies and between the eyes for the guys. At first, I felt a combo of heartache and hubris.

(Hubris is just Latin for being a self-centered ego-freak jerk. I needed an “h” word to flow with heartache.)

Heartache because I don’t want them to look older. If our friends look older, that means we have to confront our parents getting older and all the things we still want to accomplish or we have to start settling for reality and we’re moving into a new phase in life and I was comfortable in the youthful phase and now our youth is gone and time is passing and you can never go back and ahhhh. Life is so short.

Hubris because deep in the back of my mind I thought, “better her than me.” What a jerk. As if I was so immune and not just five years younger. And, actually I also felt a little annoyed at my friends. Why wasn’t he taking better care of his skin? Why is he letting those creases get so deep? Lazy. After all, I had to look at his wrinkles and see my own mortality. And, shouldn’t looking at your friends’ face be all about you, anyway?

But then, pretty much the day after I turned 35, I saw this…

Fair skin mouth line wrinkle

There’s no filter or editing on that photo. My skin is that fair.

Little did I know, but noticing my first real wrinkle on the left side of my mouth started me on a process. If you’re older than me, maybe you are already further down this process than I am. If you are younger than 37, consider this a heads up.

Rationalizing aging

I started looking at older people, really noticing their wrinkles and wondering what they looked like when they were young and how they are coping with looking into the mirror at a face that shows time. How do they feel when they look at the lines on a loved one’s face?

Do they even see what I see? Do we all see our wrinkles differently? I don’t exactly stand in front of the mirror and try out all of my daily expressions so I know what they look like. Of course, a person’s perspective changes with age.

It’s more of a study now for me, a study of people almost like works of art. Art that shifts and changes every day. Interesting art. There’s a real beauty in aging. Isn’t there? You gain so much. You wear your life experiences on your face. You may resemble the people of the past – people you’ve lost – but you are your own. You get your own wrinkles. All yours.

What am I learning

Number 1, before you drive yourself crazy for no good reason…and before I give you any tips about how to stop wrinkles around your mouth, eyes or forehead, accept your wrinkles.

Find a place where you are ok with your wrinkles, your friends’ wrinkles, your parents’ wrinkles. And take the shortest road from here to that place.

Accept that you are growing older, like you did when you were a kid, like back when you viewed aging as moving toward something good not away from your youth. Worry about things you can really impact in your life, not the things that are inevitable.

I lost two cousins my age over the past two years. Most of us know someone who would gladly trade places with us and our wrinkle worry. Accept a wrinkle here and there and smile bigger. Make more laugh lines because you’re alive if you’re reading this.

Someone who has a real, serious health problem doesn’t have the luxury to sit around and ponder his wrinkles. Someone out there isn’t worried about one small wrinkle around her mouth because she’s got to face her mortality in much more painful or real ways.

Ok, that’s on the table now. Big reveal

Stopping my wrinkle

Alright so, you came here to find out the key step I took to stop the wrinkles around my mouth. I told you it wouldn’t be a cream or peel, and you know it’s all-natural because that’s my whole gig.

It was a pillow. A very specific pillow.

Following my 35th birthday, and the aforementioned appearance of the wrinkle that started it all, I spent a month or so doing internet searches, trying stuff, buying stuff, and asking people what they do to stop wrinkles. I studied my laugh line during different parts of the day, before wine/after wine, before/after coffee, and before/after sleep.

During that time, it become more about educating myself than scrutinizing my face or my vanity. It started to become a personal experiment on my little wrinkle guinea pig.

Making some switches

After a month’s worth of research, I was pretty well convinced that satin should be part of the equation. A general lack of sleep, not drinking enough water and sleeping with my face all scrunched up on the edge of my foam-rubber pillow was making the wrinkle worse, but research suggested a smooth, gentle satin pillowcase would at least help with one of those things.

Plus, every morning when I woke up, I noticed the wrinkle was deeper and would smooth out over the day. Yet, at night I could feel myself getting into a cozy position with my face scrunched up on the wrinkle, like folding a piece of paper in half and running your finger down the crease. Every night.

How I stopped wrinkles around my mouth

My super secret find to stop wrinkles around my mouth was actually this x-shaped satin pillow.

I put this x-shaped satin pillow on top of my cozy, squishy foam rubber pillow every night. I even travel with it, and this one, all-natural, inexpensive trick helped stop my wrinkle in its tracks.

The criss-cross shape let’s me rest my chin and forehead on the satin and my cheek in the space between. My skin stays flat or slightly taught all night instead of scrunched up on the edge of my old cotton pillowcase.

As a result, my wrinkle is still 35 even though I will be 38 next month.

x shaped satin pillow to keep wrinkles at bay

And still…

My perspective is better. Left-side-of-my-mouth wrinkle will get deeper over time. And, I will smile at it. We’re cool now. I’ve grown accustomed to the small shift in my appearance since that wrinkle happened.

Not to mention that I realized the one slightly crooked tooth I have on the bottom will influence my smile and probably keep my future wrinkles pretty asymmetrical around my mouth. Ok. No problem. Sounds structural and I like my crooked mouth, it is jaw-droppingly similar to my great, great grandmother’s smile. Nice connection to the past.

Was that the only thing?

No. But, I do think the x-shaped satin pillow was the most impactful change I made to stop my wrinkle. The results were almost immediate. When I woke up the first morning with my new pillow, the line wasn’t any deeper.

That said, at least three other small, all-natural changes I made in recent years probably helped, too, but this post is long enough, don’t you think? I’ll cover those another time.

While I put those posts together, I have a few other skincare posts you might enjoy:

Natural skin and hair care

Skincare advice from 80 years of glowing skin

DIY coconut sugar scrub feels like you’re on vacation

Two common diy skincare ingredients you should think twice about

My clothes are selected by an online stylist at Stitch Fix. I pay a styling fee. They ship me boxes of clothes to try on. I send back what I don’t want through the USPS and pay for just the items I keep. Love it. Get a box every month.

Posted on 7 Comments

3 of the best essential oils for upset stomachs

Three best essential oils for upset stomachs

Essential oils are one of many all-natural remedies to help with a tummy ache. They are pure, powerful and effective. If someone in my family complains of tummy trouble, I use a blend of three essential oils for upset stomachs.

As with any treatment, consult a doctor before using essential oils if you are allergic, pregnant or nursing. Only your doctor can tell if you if essential oils might interact with any other medications you are taking.

Natural remedies for upset stomachs

When you think about it, most people already use all-natural remedies to combat an upset stomach.

As a kid, the school nurse used to give me peppermint candies when I complained of a tummy ache. Lots of people try ginger ale or ginger soda for indigestion.  You may even brew ginger or mint tea to combat an upset stomach. Turning to over-the-counter medicine, those little chalky little tablets (if you’ve been pregnant, you definitely know what I’m talking about) are actually calcium carbonate, which occurs naturally.

Collecting essential oils

Hubs was no believer. He found my collection of essential oils to be pretty annoying. Yeah, I understand. If you have enough of them, those tiny brown bottles take up entire shelves in your bathroom and appear in bags, drawers and cabinets all over the house and car. If you live with someone, that person might get a little frustrated with your essential oil collection. Until…the moment comes when she or he needs them.

This blend of three essential oils works so well on my husband’s upset stomach, it changed his perspective on my whole collection of little brown bottles. Whenever he isn’t feeling well, he asks me to blend these oils for him to rub on his belly, and it hasn’t failed him yet.

Where do I buy essential oils?

Your friends and family may have strong preferences for a certain brand of essential oils over another. I don’t. Just do a quick search online to learn more about the reputation of the essential oil company before you buy. If it’s an established, trusted essential oil company, then you will probably get your money’s worth. 

Essential oils are expensive. You can easily spend $15 to $50 on a single bottle. If you can afford them, they do last a long time. I’ve had many for several years, which is why I built up such a large collection that they are all over the house.

You can find a huge variety of essential oils online direct from the manufacturers, via local sellers through multi-level marketing or on Amazon. I don’t sell them, but my sister does. Here’s a link to her site, if you want to check it out. I really don’t know why she has a photo from 10 years ago on there.

Three best essential oils for upset stomachs

As an Amazon Associate, I earn from qualifying purchases.

Best essential oils for upset stomachs

My favorite essential oils for upset stomachs are:
peppermint
ginger
fennel

You can use any one of these three essential oils for an upset stomach by rubbing them on your stomach. I blend a drop of all three, but they are expensive. If you can afford it, the blend of all three is marvelous! Alternatively, if you have a friend with a collection, check and see if he or she has all three of these and can make you a roller ball. 

A roller ball filled with just a few drops of each essential oil blended into a carrier oil, like fractionated coconut oil, will go a long way. Fractionated coconut oil is processed so that it remains in liquid form at room temperature. You can roll the roller over your stomach as needed.

Here are my top picks for the three best essential oils for upset stomachs.

#3 Fennel

Fennel essential oil has a mild, sweet licorice scent. The essential oil is derived from fennel seeds using a steam distillation method. During the steam distillation process, the part of the plant from which the oil will be extracted is placed inside of a contraption that looks like something straight out of your high school science lab. Water is heated so that steam passes through the plant material for anywhere from a few hours to more than a day, depending on the plant. The essential oil is released and separated from the water.

#2 Ginger

Ginger essential oil is peppery and powerful. If you have sensitive skin, you should blend ginger with a mild, carrier oil before applying it to your skin. There’s a chance it could irritate your skin if applied directly. The essential oil is extracted by steam distillation from the rhizomes of the ginger root. Rhizomes are pale, thin shoots that branch out from the root system.

#1 Peppermint

My favorite go-to essential oil for stomach aches, big breaths and sore muscles. If I could only choose one essential oil for my cabinet at home, it would be peppermint. The entire plant is put into the steam distiller to make this essential oil. You are probably most familiar with the strong scent of peppermint oil in chewing gum, candy and toothpaste. Like ginger, peppermint is a strong oil that you should consider blending with a neutral, carrier oil before applying to your skin.

Test before you slather

The FDA does not regulate essential oils, as they are generally not considered to be pharmaceuticals. Always test a small patch of skin with any new topical treatment to check that you are not allergic or sensitive to the ingredients.

Everyone is different, and allergies may occur. Coconut oil is usually a good carrier oil, but some people do develop a sensitivity to it over time. You can also consider grapeseed oil, almond oil or even a light olive oil to use as a carrier oil, if you prefer them to coconut. Almost any mild, unscented oil will work just fine.

Three of the best essential oils for upset stomachs